
Booklet Printing
Introduction
You are likely to have noticed already that the county records, forms and official documents are all formatted as A4 documents. All are available as Adobe PDF documents, because this is probably the most universal format out there - virtually every new PC and notebook comes with Adobe Reader preinstalled and if not, well it is easy to download and install it for free.
PDF documents have several advantages - they are often smaller than Microsoft Word (97-2003) equivalents, so they download faster and they give you some useful print options that you would not otherwise have. Especially useful is that you can print the document as A4 in the normal way, or as a properly paginated A5 booklet.
If you start with an A4 document, you can halve the paper required by printing double sided but this still uses the same amount of ink. As an A5 booklet you use a quarter of the amount of paper again and half of the ink (approximately) as compared to single-sided A4.
The following process might require a bit of experimenting to get familiar with it, so start with a short booklet - a 4-page document will print on just one sheet of paper, or an 8-pager will help test the manual reinsertion order.
How To Print as an A5 Booklet
The following assumes that you have already installed Adobe Reader v9.0 or later and applies to WindowsXP onwards; there is no guarantee that similar features are available for Apple Mac or Linux-based PCs or for earlier versions of Adobe Reader. The illustrations below are taken from Adobe Reader 9 - later versions differ in some details, but do operate to very similar principles.
Once you have opened the PDF document you will see a printer icon in the tool-bar - click on this and it will open Adobe Reader's print dialogue.
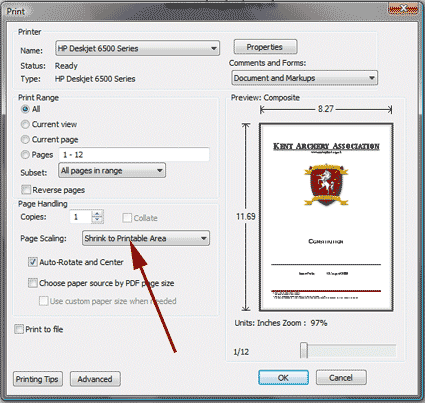
Figure 1: Adobe Reader's print dialogue with default settings for A4 documents.
When you first open the Adobe Reader print dialogue, it is most likely going to show the standard default settings for printing the document as single-sided portrait A4, using your default printer with that printer's default settings. So first we are going to tell it to print a booklet, then check that the printer is set up to do so.
Now go to the Page Scaling drop-down to the left of the document image and select "Booklet Printing" from the drop-down list. The dialogue box will change to show two scaled-down pages, side by side on a single landscape sheet - some of the selectable options will also change. This is the point at which the document is "imposed", i.e. the order that the pages are printed will be resorted so that once the sheets are put together and folded, they will form a booklet with the pages in the correct order - provided you print them correctly!
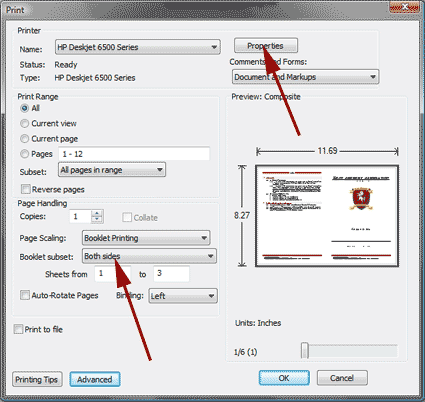
Figure 2: Adobe Reader's print dialogue with settings for booklet printing.
Now we have told it to print a booklet, the pages will be reorganised into a single "signature". If you fold several pieces of paper in half and insert one inside another, that is a signature. Too many pieces of paper arranged like this will look untidy, but just how many depends on its size and thickness; for standard A4 copy paper (80 g.s.m..) the limit is probably about 10 sheets; that's good for a 40 page booklet.
Large books are best printed as a number of signatures (modern hardback books are normally printed at about 12-15 sheets per signature, but the paper is much lighter.
The main limitation of the method explained here, is that larger books cannot be divided into several signatures - bear that in mind if the KAA ever publishes any that big!
If the document contains a mixture of portrait and landscape pages, check the Auto-Rotate Pages box - this will spin any landscape pages through 90° to make full use of the A5 portrait pages of the final booklet. It is OK to check this box even if there are no landscape pages, as it will make no changes to your document.
Note: I have had some problems with Auto-Rotate when there is an odd landscape page part way through a document; Adobe Reader appears to rotate pages correctly without a problem, but some printer drivers get confused and only print a part of each page (albeit correctly oriented). For this reason we have tried to keep landscape pages together at the end of a document.
Ensure that the Binding option is set to "Left" (binding on the "Right" is primarily for languages that read right to left).
At the top of the Adobe Reader dialogue box, select the printer that you want to use and press Properties to open the printer settings - this should be familiar territory as it is essentially the same dialogue that you will get for most applications on your PC. It is not shown here, because it will differ from printer to printer. Set the print quality that you want and make sure that the paper orientation is set to Landscape.
At this point it gets different, according to whether or not your printer allows automatic two-sided (duplex) printing:
Automatic Two-Sided Printing
Select "Automatic Two-Sided Printing" and make sure that it gives you "short edge binding"; this ensures that both sides of the page are printed the same way up (long-edge binding prints the reverse side up-side-down, rather like a drop-down wall calendar).
If your printer allows you to save custom profiles, I suggest that you do so now as this will save a lot of time and frustration the next time you want to do this!
Close the printer settings and return to the Adobe Reader print dialogue.
Next make sure that the Booklet Subset drop-down is set to "Both sides"; Now hit the OK button and with a following wind you will have your booklet. You might have to adjust the printer settings to get it just right, but if you do, remember to save the new settings to replace the earlier profile.
Manual Two-Sided Printing
Close the printer settings and return to the Adobe Reader print dialogue.
Set the Booklet Subset drop-down to "Front side only"; When you hit the OK button you will print just the front side of each page. Reinsert the paper (normally face up) to print the back, repeating the above process, but set the Booklet Subset drop-down to "Back side only". If you put the paper in the right way up, the right way round and with the right one on top you will get your booklet.
Printing An Individual Page
OK, so you printed off a forty page County Records Book and now just one page has changed and you don't want to reprint the whole thing! If you originally printed the document as single-sided A4, then printing just one page is easy; if you printed it two-sided A4, then it is only a shade more difficult to do; but what about an A5 booklet?
It can be done and it is not too difficult! The Adobe Reader print dialogue allows you to specify which "sheet" you wish to print; this is done just below the Booklet Subset drop-down. When we were printing the whole booklet, we did not bother with this setting, because it defaults to the whole range.
A 4-page document prints on one "sheet", a 40-page document on 10 "sheets"; all you have to know is which sheet you need to print. Look at the old sheet that you want to replace and find the lowest page number on it (the cover is page 1 and any un-numbered pages can be ignored) - this number must be an odd number. Add 1 to that number, then divide the result by 2 - that's the sheet number you want to print.
Set the Sheets from and to values to this number, and follow the same routine for automatic or manual two-sided printing.
